If you face any issues building the assignments, please feel free to ask for help on Ed. If you still have problems with setups, please do not hesitate to come to office hours, homework parties, or the end of discussions for help! We will do our best to help get assignments up and running on your machine! :)
We highly recommend that you use a real IDE to code for assignments in this class, not a text editor such as Sublime Text or unconfigured Visual Studio Code. Many assignments require very serious debugging. A real IDE will make debugging significantly easier for you than a text editor. We strongly encourage you to use:
- Visual Studio (Windows)
- Visual Studio Code can be configured as follows(MacOS/Linux only) to be turned into a full-blown c++ IDE.
- Xcode (MacOS)
- CLion (All Platforms), free with Jetbrains Student License
In short, to build CS184 assignments, you need to perform the following steps:
- Download the assignments
- Set up code environment for your machine (needs to be done only once)
- Compile and run the assignments (needs to be done for each assignment)
For submitting your assignments, please visit this link.
0. Downloading Assignments
When an assignment is released, it will appear in your CS184 website profile, under Assignments. Once you accept the assignment through GitHub Classroom, a private repo will be generated for your assignment. You will need to clone and push to this repository that has your username in the repo name, and not the class skeleton.
$ git clone <YOUR_PRIVATE_REPO>
where<YOUR_PRIVATE_REPO> is the https link on the GitHub repository page. If you have not used git before, you may find this introduction helpful. Connecting to GitHub with SSH is also recommended to avoid typing your username and password everytime.
1. Setting Up C++ and Dependencies on Your Machine
Note: You need to perform these steps only once.
Platform: Windows, MacOS, Linux, Instructional Machines, and Others.
Windows
Here's a video walkthrough of installing the IDE & building the project on Windows.
- Install Visual Studio 2019 or newer
- Select "Desktop Development with C++" when installing Visual Studio
- Install Git for Windows
- Install Vcpkg
- Open a PowerShell / CMD / Git Bash in the folder where you wish to install vcpkg, (e.g.
C:/) - Vcpkg is a package management software that downloads and builds the required software dependencies
git clone https://github.com/microsoft/vcpkg- Go into the
vcpkgfolder .\bootstrap-vcpkg.bat- After vcpkg is installed, install the dependency of this project
- On 64-bit system (most systems today)
.\vcpkg.exe install freetype:x64-windows - On 32-bit system (may not work well)
.\vcpkg.exe install freetype
- On 64-bit system (most systems today)
- Open a PowerShell / CMD / Git Bash in the folder where you wish to install vcpkg, (e.g.
MacOS
- Open up your terminal and run
xcode-select --install. Accept the XCode license if prompted. If in the later steps, you are unable to build, then try installing XCode through the Mac App Store. - You should now be able to run
g++ --versionwithout any errors. - We will be using CMake to build the assignments. If you don't have CMake on your Mac, you can easily install it by first installing HomeBrew (a third-party package manager for MacOS), and then running
brew install cmake. Alternatively, you can download CMake directly from the CMake website. - You will also need to install freetype libraries. A convenient way is by getting HomeBrew, and then running
brew install freetype.
Common errors:
- "CXX compiler identification is unknown": Try running
sudo xcode-select --reset; sudo xcodebuild -license accept.
Linux (Ubuntu / Debian / apt)
Install the C++ build tools using the commands below. This assumes that you are on Ubuntu/Debian. Here is an explanation of each packaging necessary:
build-essential: A bundle that contains most packages needed for compiling C/C++ projectscmake: The tool used to build assignmentsxorg-dev: A bundle containing many dependencies related to X Window Systemlibfreetype6-dev: A dependency used by CS184 homeworksmesa-common-dev libgl1-mesa-dev libglu1-mesa-dev: OpenGL development libraries
sudo apt update
sudo apt install build-essential cmake xorg-dev libfreetype6-dev
sudo apt install mesa-common-dev libgl1-mesa-dev libglu1-mesa-dev
Use the Instructional Machines (Soda 330)
The EECS department provides instructional computers to students enrolled in a CS class. To get an account, create a WebAcct on the EECS instructional account webpage. If you run into an error when creating an account, such as "Unable to find a new login for cs184", please email inst@eecs.berkeley.edu, and they can help provide your login information.
The easiest way to use the instructional machines is to make the trek to Soda and physically use the desktop computers in Soda 330.
SSH Remote Access of Soda Machines
All these steps should run with no issues on the hive (Soda 330) instructional machines. You can access these machines by ssh-ing in, e.g.
ssh cs184-???@hive##.cs.berkeley.edu
where cs184-??? is your WebAcct name and hive## is the ##-th computer in Soda 330 (notice there is no dash). Unfortunately, OpenGL won't play nice with ssh, so in general, you will only be able to compile your code over ssh, not run it. However, for some homeworks, you can render the images and download them over scp or imgcat. Otherwise, you will have to physically travel to Soda 330 to verify that your code runs correctly.
You can check the availability and usage of the hive machines using hivemind. These machines are available in person, though be mindful of any labs or classes that may be using the lab.
If you develop on your personal computer and then would like to copy the code over to test it, you can use the scp command from the base project directory (on your own computer) as follows:
scp -r . cs184-???@hive##.cs.berkeley.edu:~/destination_folder
After inputting your WebAcct password, all your files should be copied over as when using the normal cp command. Note that when you move code between computers, you will probably have to recompile, since the binaries are rarely cross-compatible.
If you modify code while working on the instructional machines, you can reverse the scp process to transfer the files back to your own computer by running this command from your personal computer.
scp -r cs184-???@hive##.cs.berkeley.edu:~/hw1_folder ~/destination_folder
Setup on Other Operating Systems
Course staff will try our best in assisting you, but we can only confidently provide support on platforms listed here since there are too many platforms available to provide detailed instructions on all of them.
If you use a platform not listed here, you may have to use Google figure it out yourself. Try building the projects and installing whatever missing development libraries are needed. There are several main components you will need in order to build CS184 assignments:
- C++/G++ build toolchain
- CMake
- Xorg build headers
- Freetype development libraries
If all else fails, you can use the EECS instructional computers as those are known to work with CS184 homeworks.
2. Compiling and Running Assignments
Note: You will have to perform these steps at least once for each homework.
Program: Visual Studio, XCode, CLion, Command Line, and Visual Studio Code,
Visual Studio (Windows)
- Accept the assignment via your profile page in the course website
- Open Visual Studio, use "Clone or Check out Code"
- Use the GitHub repository link
- After the project is opened and the files are listed, right click on
CMakeLists.txt, and then click "CMake Settings for Assignment1"- On the left, press the add button and add a configuration with "x64-Release" (or "x86-Release" on a 32-bit machine).
- Then, find field "CMake toolchain file", enter
[location of vcpkg]/scripts/buildsystems/vcpkg.cmake. (e.g.C:/vcpkg/scripts/buildsystems/vcpkg.cmake)
- "Build" -> "Build All"
- Then, open the src folder and right click the main file for this project (e.g. drawrend.cpp for Homework 1, and select "Set as Startup Item."
- Then you can run your project
- To set the arguments for running the project:
- Select
draw.exeas the running target (The select box on the right side of the green "Run" button)
- Select
- Go to Menu -> Debug -> Debug and Launch Settings for draw
- After
"name": "draw.exe", add a comma and a new line:"args": ["../../../svg/basic/"](or any specific svg file of your choice) - Your whole debug and launch config should look like this:
{
  "version": "0.2.1",
  "defaults": {},
  "configurations": [
    {
      "type": "default",
      "project": "CMakeLists.txt",
      "projectTarget": "draw.exe",
      "name": "draw.exe",
      "args": ["../../../svg/basic/"]
    }
  ]
}
Refer to the debuggin section for using the debugger in visual studio.
XCode (MacOS)
Prof. Ren Ng made a helpful video tutorial on XCode similar to the instructions here. The video also contains additional details on how to debug using Xcode.
- Make sure that the latest Xcode.app is installed through the Mac app store
- Accept the assignment via your profile page in the course website
- Clone your assignment repository from GitHub (ssh is recommended)
- Open your Terminal and use
cdto change directory into the homework folder - Create a folder called
xcode, and CD into it:mkdir xcode; cd xcode - Setup cmake for XCode (while inside the
xcodefolder):cmake -G Xcode .. - Open
Finderand navigate to thexcodefolder - Double-click on the
<Homework Name>.xcodeprojfile to open the project in XCode (it has a blue icon with a pen and paintbrush) - Build the project by clicking
Product > Buildon the top bar of your screen - Click on
ALL_BUILD, located near the top right of Xcode (see Ren's video for more details) - Click
Edit Scheme - Select
Runon the sidebar - Select
Infoon the top bar of theRunpage - Set
Executableto the executable (in the case of HW0, it isquad_test) - Select
Arguments(insideEdit Scheme > Run) to specify arguments (not necessary for HW0) (see Ren's video for help finding it) - Select
Options(insideEdit Scheme > Run) and specify the working directory to be thexcodefolder. - Press the play button to compile and launch the program
Common errors:
- If the C/C++ compiler can't be found when running cmake (step 6 above), try specifying the compiler with environment variables:
CC=gcc CXX=g++ cmake -G Xcode ..
CLion (Windows / MacOS / Linux)
Successfully building in CLion requires following a specific set of instructions. Please make sure to read these instructions especially carefully. If you are on Windows, you will still need to follow the setup instructions and install Visual Studio since C++ is bundled with Visual Studio.
- Accept the assignment via your profile page in the course website
- Clone your assignment repository from GitHub (ssh is recommended)
- Open CLion (available for free with a Jetbrains Student License)
- Be at the
Welcome to CLionwindow. It is the window opened by default. To get here, close all CLion windows and reopen CLion. - On the right side of the window, click
Open - Navigate to your homework folder in the file explorer that just popped up
- Select
CMakeLists.txtand press open (it only works if you select this special file) - Click
Open as Project - Find the build project buttons and build
- To specify program arguments, find the run menu, and use
Edit Configurations(not necessary for HW0, but important for later homeworks) - Run the project either through the CLion GUI or through the command line (the binary will be inside the
cmake-build-debugfolder)
Command Line (MacOS / Linux / Windows)
We recommend using command line build with a configured text editor, such as Visual Studio Code or neovim, when configured with clangd to enable syntax highlighting and advanced debugging.
- Accept the assignment via your profile page in the course website
- Clone your assignment repository from GitHub (ssh is recommended)
- Open your Terminal and use
cdto change directory into the homework folder - Create a folder called
build, and CD into it:mkdir build; cd build - Setup cmake (while inside the
buildfolder):cmake ../ - Build the project (while inside the
buildfolder):make - Run the project (while inside the
buildfolder):./quad_test(or whatever the binary name is)
Difference between cmake ../ and make
cmake and make do completely different things:
cmakegenerates a c++ project from the configuration file(CMakeLists.txt) in your project root foldermakecompiles all the c++ code in the project into a binary.
Unless you wish to change the project structure, (for example, adding a new library, creating a new .cpp file, or switching between debug and release build), cmake ../ only needs to be run once for each project.
make, however, needs to be run every time you modify your code, to rebuild the application.
Using Ninja as the build system(Optional)
When building large C++ projects, you can use "Ninja" instead of "Make" to significantly speed up rebuilding times(more than 10x!).
To install, run brew install ninja on macOS, or sudo apt install ninja on ubuntu-linux(or other package manager of choice for other distros).
To use Ninja, replace the step 5 command with the following:
cmake -G "Ninja" ../
And for step 6, run ninja instead of make
Visual Studio Code (MacOS / Linux)
Visual Studio Code(VSC), when configured with LLVM Clang, turns into a powerful and performant C++ IDE.
Note that if you are a windows or macOS user, you may still need to install Visual Studio/XCode following Set up code environment for your machine. This is to ensure that your machine has required C++ dependencies(GDB, CMake, and g++ compiler). Installing the dependencies through other means is possible but not recommended as they are more complex.
To enable features such as syntax highlighting and debugging, install the following VSC plugins(this is a one-time process):
- C/C++

- C/C++ Extension Pack

- clangd

Once done, refer to the Command Line portion to pull code and build the project.
Right after running cmake .. command to generate project files, clangd should provide proper syntax highlighting.
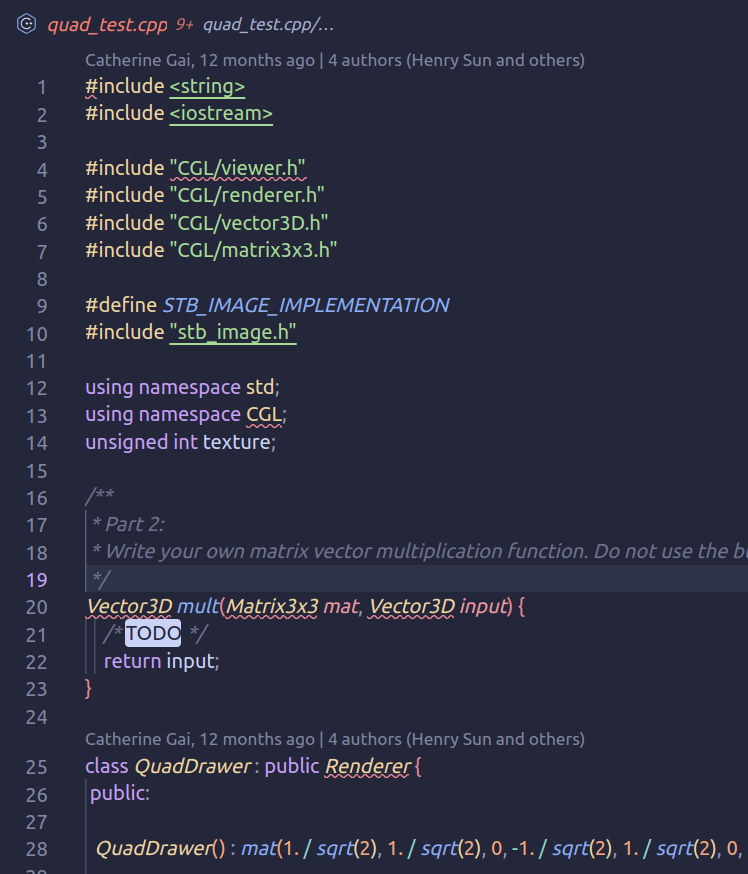 |
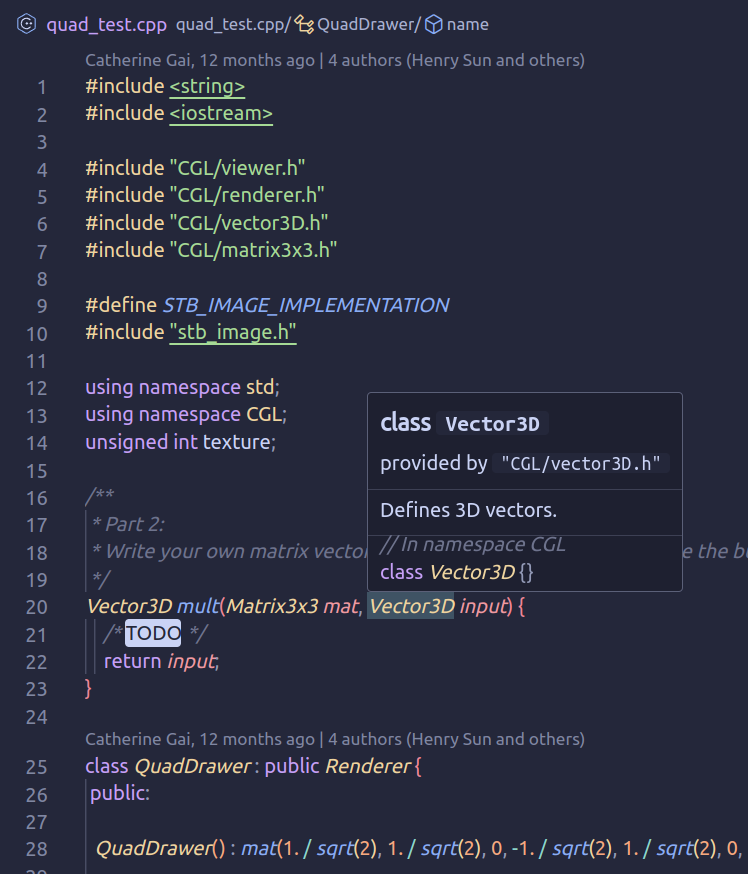 |
|---|---|
| Syntax Highlighting not working | Syntax Highlighting working; hovering on types correctly shows their origin |
Formatting Code
To format your c++ code, use the combo key Ctrl + k + f(windows/linux) or Cmd + k + f(macOS). Clang automatically formats your current file.
If you do not like the default indentation level(2 spaces per indentation), you can create your custom format configuration by creating a text file named .clang-format under the project root directory. Setting IndentWidth: 8 configures the indentation width to a more readeable format.
Feel free to use the following template config:
BasedOnStyle: LLVM
# Sets the base style for formatting. The LLVM style is used here.
IndentWidth: 8
# Specifies the number of spaces used for indentation.
ContinuationIndentWidth: 8
# Sets the width of the continuation line indentation.
PointerAlignment: Left
# Aligns the pointer symbol to the left with the type (e.g., int* a).
ColumnLimit: 120
The full format config manual can be accessed here
Debugging
Setting up the debugger configuration may take some time, but the insight and control you have over the debugger is far greater than plain printf() statements!
Visual Studio
To debug in visual studio:
-
Set up the debug configuration(only needs to be done once per homework):
right click on
CMakeLists.txt, and then click "CMake Settings for AssignmentX"- On the left pane, select "X64-Debug"
- Then, find field "CMake toolchain file", enter
[location of vcpkg]/scripts/buildsystems/vcpkg.cmake. (e.g.C:/vcpkg/scripts/buildsystems/vcpkg.cmake):
-
Switch to debug configuration:
On the top pane, click on the drop-down as shown below, and select "X64-Debug"

After switching, the "startup item" may reset. Make sure you select the correct executable, in our case the executable is "draw.exe":

-
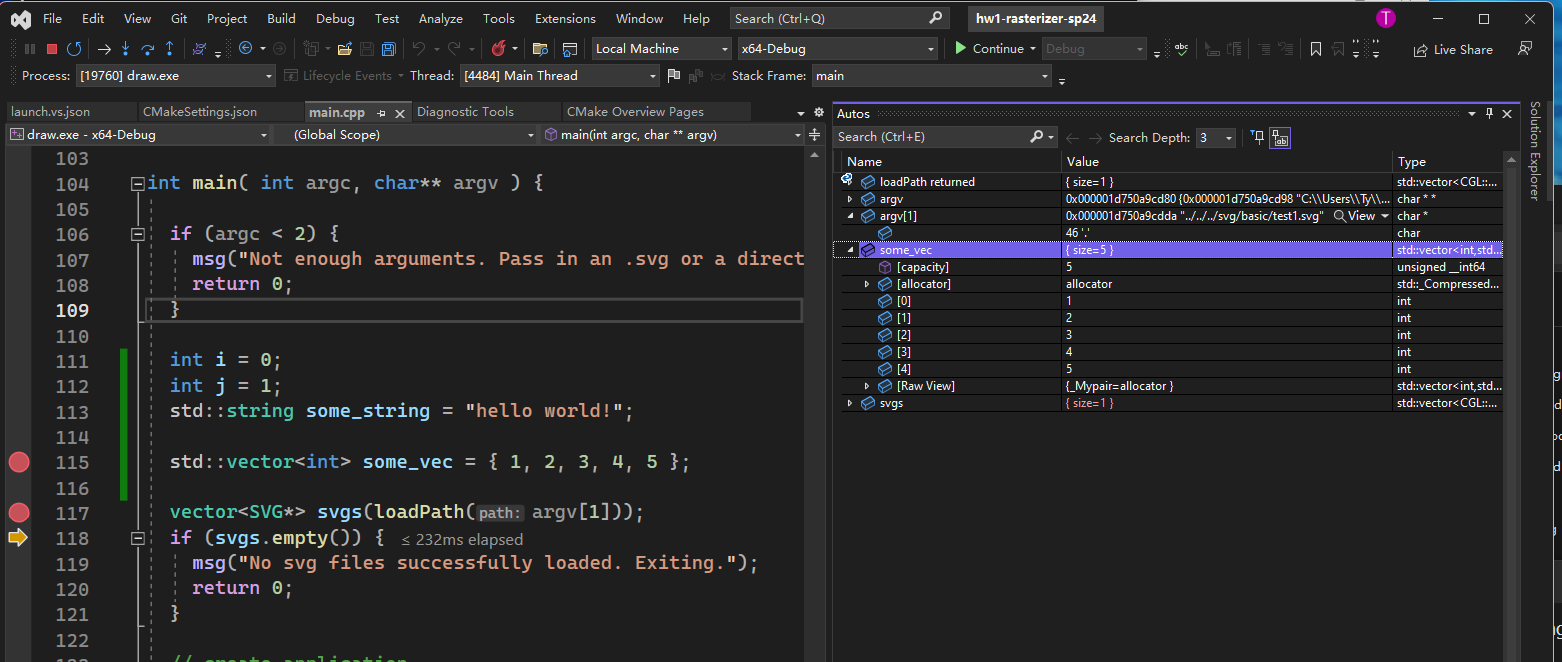
Set breakpoints and run the binary through VS
Set breakpoints at parts of the code you wish to debug, then run the binary as usual through Visual Studio. The program will keep executing until hitting the breakpoint. You can then perform debugging actions such as variable inspection and stepping in/out of function calls
To stop the program, press shift + F5.
Once you've done debugging, remember to switch back to the "release" configuration through the dropdown menus. Due to a series of aggressive optimizations made by the compiler, programs in the "release" configuration run much faster but do not work well with the debugger.
Visual Studio Code
Visual Studio Code interfaces with the GDB/LLDB to provide debugging functionalities.
-
Rebuild the project into a debuggable binary
Regenerate the cmake files, but with
DCMAKE_BUILD_TYPEset todebug. By default, both the clang and g++ compiler optimize away a significant chunk of the c++ code; the optimization makes default compiled binaries not suitable for debugging. Setting build type to debug disables all the optimizations.cd build && cmake -DCMAKE_BUILD_TYPE=Debug ../ -
Set up debug configuration(needs to be done only once per project).
- Click on the "Run and Debug" symbol on the left side bar.

- Click on
create a launch.jsonfile, which prompts you to the newly createdlaunch.json, the configuration file for VSC debugging. - Paste the following template debugging configuration into the file, depending on your OS:
MacOS:
{
  "version": "0.2.0",
  "configurations": [
    {
      "name": "(lldb) Launch",
      "type": "cppdbg",
      "request": "launch",
      "program": "${workspaceFolder}/build/quad_test",
      "args": [],
      "stopAtEntry": false,
      "cwd": "${fileDirname}",
      "environment": [],
      "externalConsole": false,
      "MIMode": "lldb"
    }
  ]
}
Linux:
{
  "version": "0.2.0",
  "configurations": [
    {
      "name": "(gdb) Launch",
      "type": "cppdbg",
      "request": "launch",
      "program": "${workspaceFolder}/build/quad_test",
      "args": [],
      "stopAtEntry": false,
      "cwd": "${fileDirname}",
      "environment": [],
      "externalConsole": false,
      "MIMode": "gdb",
      "setupCommands": [
        {
          "description": "Enable pretty-printing for gdb",
          "text": "-enable-pretty-printing",
          "ignoreFailures": true
        },
        {
          "description": "Set Disassembly Flavor to Intel",
          "text": "-gdb-set disassembly-flavor intel",
          "ignoreFailures": true
        }
      ]
    }
  ]
}
For different projects, configure
programto change the name of the binary; configureargsto pass in different arguments as you would through the command line. - Click on the "Run and Debug" symbol on the left side bar.
-
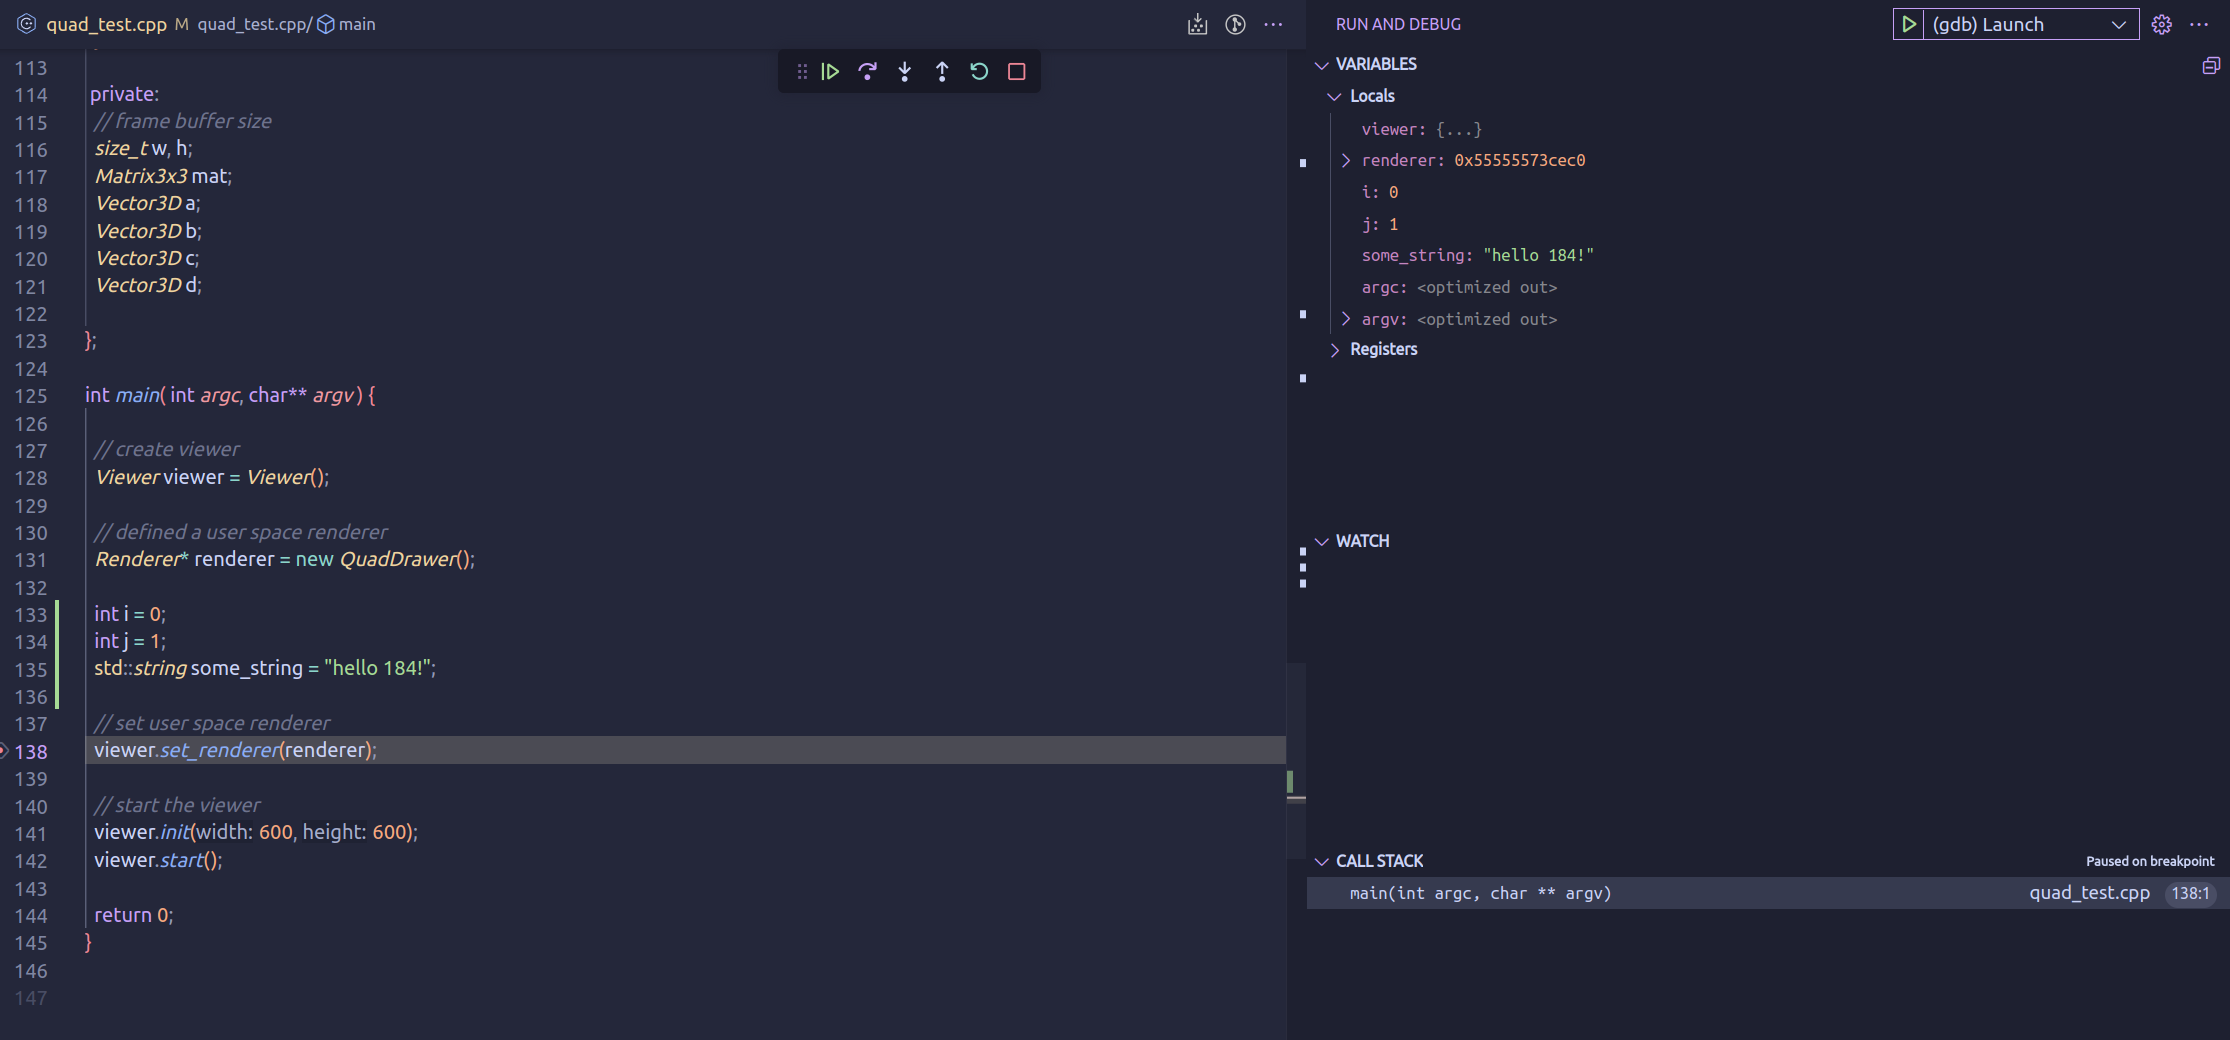
Set breakpoints and start debugging by going back to the debug panel, and clicking on the newly created
(gdb) launchor(lldb)launchbutton. VSC will run the program, interface with gdb/lldb, and let you perform debugging actions.